When you first want to learn acrylic pouring it’s difficult to know what materials you need. There are certain things you will need to get started. You don’t need all 28 to start pouring but you will likely find that you need many soon after depending on what you want to do and where you want to take your art journey.
The basic materials you need to start acrylic pouring are canvases, acrylic pouring paint, and cups. There are many more materials and equipment you can get as you progress like acrylic paints, pouring mediums, and stands.
I kept it as simple as possible when I started to learn acrylic pouring as I didn’t want to worry about all the variables like mixing and paint strength and mediums. Doing this saved me a lot of time, disappointment, and money. I share what you need to start painting as you continue your acrylic painting journey below.
What Materials Do You Need For Acrylic Pouring
You don’t actually need that much in the way of materials to start acrylic pouring. But once you get into it you will need or more accurately want a lot more.
I started with canvases and acrylic pouring paints. I managed to get everything else I needed from around the house. Within a short time, I realized that to improve my art there were other things I needed as well.
To start a basic acrylic pour all you need is the following:
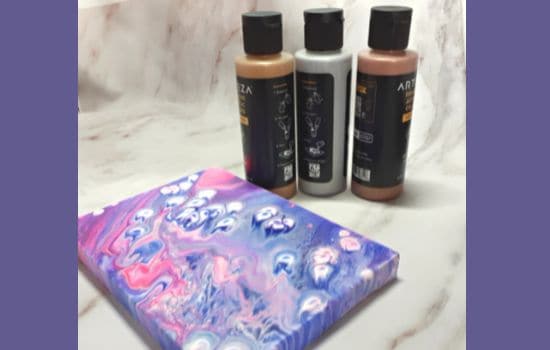
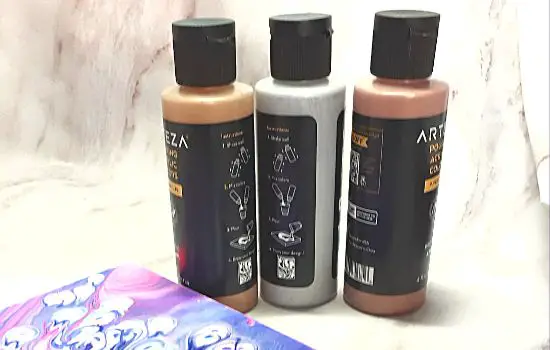
1. Acrylic Pouring Paints
I used acrylic pouring paint. You can get them from artists’ stores or at Amazon below picture(affiliate link).
The reason I did this was even though I had normal acrylic paint after watching dozens of YouTube videos of all the different recipes, methods of deciding thickness paints that you can use, and which mediums, I decided I wanted to know what I was using would work and be reliable. If I messed up I’d know it was me and not the paint mix. While having fun I then studied further to see what paints to use later on.
If you prefer to go straight to mixing your own paints I have shared the paints and mediums you need later in this article.

You can get different brands of acrylic pouring paint. I chose Arteza Pouring Paint because I use that brand for my other art sometimes and know it’s not a bad paint for the money.
I then decided to go metallic and got some Mont Marta Celestial. Oh my. Absolutely stunning even for a newbie! (just don’t overdo the black in your actual pour).

You can get this On Amazon here (affiliate links).
This is a great pack for starting out. Although, I thought it was gold bronze, and silver it wasn’t it was gold bronze white, and black. If you already have black and white you might like just to get individual bottles of the metal you want.
Regardless of which brand you choose make sure you get acrylic pouring paint. Other types of paints come up in the search and it’s easy to get carried away.
2. Small Canvases or Canvas Boards
You will need a few canvases to practice on.
When starting out you don’t need huge canvases I’d go no bigger than an 8″x10″ or 9″x12″ (20cmx25cm or 23cm by 30.5cm approx.)
You can use stretched canvases or canvas boards.
Canvas Boards Advantages & Disadvantages
Advantages
- They are cheap to buy
- Space-saving as they are thin.
Disadvantages
- They are thin and don’t look so good as canvases
- You have to be careful what ones you get or they will warp and bend as they are not meant to have so much paint on them. Go for MDF-backed ones for added strength.
- The finished artwork does not look as good, which is no biggy for the first half dozen or so pictures.
Canvases Advantages And Disadvantages
Advantages
- You get better results with canvas than with boards. The edges look better which immediately improves the artwork in my view.
- Although they can be more expensive to buy you can reuse them 3 maybe 4 times before you have to throw them out. Which painting for painting works out cheaper long term.
- They don’t curl up and warp.
- If you do get it right you have a painting you can keep.
Disadvantages
- Stretched canvases are better but often more expensive. If you hunt around you may be able to find canvases the same price as canvas boards. You don’t need the most expensive canvases on the market for pouring, cheap ones work just fine. I get mine from Amazon and sometimes locally.
- Canvases take up more space than boards when you store them.
3. Cups
I was going to start painting without buying cups and quickly realized my mistake. You need small plastic cups or beakers that you can use for pouring only I also use plastic shot glasses for my tiny paintings. You can get these very cheap from the $/£ stores. You do need quite a few if you pour several pieces at once or if you mix your own colors.
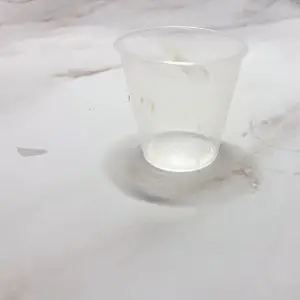
When I started the experienced pourers said you can easily clean your plastic cups to save waste by peeling back the dried paint. Er no, at least I haven’t had any success with cleaning throwable cups. It’s worth a try though.
I’d start with plastic cups for ease, however, if you can’t clean them it’s a bit wasteful. I wouldn’t recommend normal glass cups but something stronger like Pyrex would work well for some techniques. I’d keep them separate from your normal cooking cups and not use them for anything else though.
Also, a mistake I made as I wasn’t paying attention was to buy in white cups, which is a pain especially since I have a YouTube channel pouring and people need to see the colors. While for some techniques it doesn’t matter I feel it helps to be able to see the clear edges and layers of paint.
4. Palette Knife
You need something to spread your paint over the canvas.
In acrylic pouring artists used palette knives to spread the underlayer of paint, and spread paint around the edges. Help with design. Remove paint from the edges.
You can use an alternative. You could use a palette knife for cakes as an alternative, or even a ruler to get started. (once used though it will have to stay for pouring only).
5. A Flat Surface
Your surface needs to be very flat. As pouring paint is so fluid if it’s not all your paint can run off the edges. I haven’t had that issue but if you are mixing your own paint you might make it even runnier which means more runoff. Also, some of the techniques use runnier paint than others.
Some artists also use a spirit level to make certain the surface is flat. If you have one great, if not I wouldn’t worry too much until you really need one and are doing larger pieces.
I only do small pieces and haven’t had too much trouble with continued runoff while I paint but my surface is definitely not even.
The other issue is the flat surface while you work. This can depend on your designs. I’ve found it’s not too bad with smaller pieces and the techniques I use as I am holding the painting a lot of the time.
6. Stands And Feet Risers
You not only need to keep your paint flat you need to keep it raised up. Both in the painting process and while it is drying. You can use a canvas stand or feet risers for acrylic pouring for this.
If you want to hold off on the extras until you are sure this way of painting is for you, you can also use pins and push them into the back of the canvas (only use on stretched canvas, not boards).
I used plastic cups for drying. It’s not ideal and they do stick a bit but I had them anyway. As long as your picture is both flat and raised.
Your painting needs to be stable as it can take 24 hours or more to dry especially if you are using the mediums. The pouring paints say they only take 4 hours to touch dry. I haven’t found that to be the case.
7. Gloves
A nice to have is some gloves if you don’t like having to clean out paint from your nails.
8. Old Clothes
Definitely wear clothing that you don’t mind getting paint on including shoes.
9. Protective Cover, Plastic Covering, Wipeable Surface
Oh my, it’s messy! My sister took only a look and said it wasn’t for her as the mess was everywhere. If you get into spinning your work it will be worse. So you want to protect your surrounding area and floor where you work. If you do a small piece you only need a plastic sheet where you work. But don’t work near anything you don’t want to get paint on.
10. Kitchen Towels/Sponge To Clean Up Your Pouring Work Area
You need something to wipe the paint with whether it be a kitchen roll or sponge, etc.
11. Paint Brushes Are Great For Additional Shapes And Lines
You might not need this for your first few pours. It’s likely that you will mostly just do a dirty pour until you get used to it. Some artists might not use a brush at all.
Things I found I wanted to get within a few pours:
It didn’t take long for me to outgrow the basic pours and want to experiment. Also, after a few pours, you start to notice things on your pours that could be improved. Not to mention I was getting through an awful lot of black and white paint.
12. A Blow Torch Or Alterative
OK maybe not wanted as such as the idea of a torch makes me cringe. But it’s an essential part of acrylic pouring.
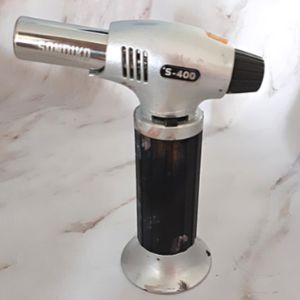
A blow torch is used for a couple of things.
It is used to pop bubbles by briefly going over the canvas with it. Bubbles can ruin an otherwise good piece as it leaves a tiny hole shape in your work. You can pour gently but there is no guarantee of a bubble-free piece. Also, if you decide you want to mix your paint you are more likely to get bubbles. You can also pop them manually with something sharp if you don’t want to invest in a torch yet. provided you can actually see them! I used a BBQ skewer cut down as that was all that was handy.
It’s also used to help bring out more cells and larger cells. Although some say it doesn’t create cells, it looks like it does. You can get them on Amazon (affiliate link). I recommend that you look at the cook’s blow torches as they are cheaper than the art ones.

Not everyone likes blow torches. Alternatives are a BBQ lighter with flame or a blow torch. Blow torches can move the paint though. You can also use a hairdryer although due to the way it works and blows the paint around the effects are different. Be prepared to get paint on it though.
13. A Straw For Blowing Shapes
Artists use straws in acrylic painting, to blow the paint around to make amazing shapes and designs. You don’t need them to start with but might like to experiment once you have created a few pours.
I got silicone ones not realizing they were quite so floppy. The juries out on whether this is a good idea. I like them because you can bend them as you go but think a firmer metal straw like this one on Amazon would have been better. (affiliate link).

14. Squeezy Bottles
You need squeezy bottles to store any leftover paint or any salvaged paint. They are also great if you are mixing your own paint colors.
You can use the containers your paint came in if you buy premixed paint.
15. Silicone Oil
A lot of acrylic pouring artists use silicone oil. Its used to create those amazing cells you see in acrylic pours. There are alternatives such as dishwashing liquid and there are for and against different methods. Silicone oil is the most popular method.
Silicone oil also needs more cleaning on the finished artwork.
To Mix Your Paints For Acrylic Pour You Will Need Additional Materials
16. Acrylic Paint For Mixing Pouring Paint
Everyone has their favorite paint. Any acrylic paint can be mixed with a pouring medium. I’ve even seen people use household paint. I’ve not tried it but it worked well for them. However, some make better acrylic pouring mixes than others. There are a few things to think about.
Heavy acrylic paint is thicker and takes more dilution. It’s better to use a softer paint as it’s easier to make more liquid.
Artists’ acrylics are more expensive but have excellent pigment. Personally, I would go into meltdown using my artist’s paints for this it would cost a small fortune. You use a lot of paint in a pour.
So what to do? Some people use crafting paint like the ones below as this is cheaper and mix it with a pouring medium. However, cheaper paint has less pigment and might not be so vibrant.

Also, I’m not convinced as craft paint is designed to dry quickly and may affect your pouring. Lots of people use them though. I haven’t, I will have to try them and see how it goes. I haven’t used them because I used cheaper white acrylic paint, it dried quickly and left blobs of paint in my painting. So, not impressed.
(Amazon Affiliate link)
17. Which Acrylic Pouring Medium Is Best
You can get a proper pouring medium, especially for acrylic pouring like Liquitex acrylic pouring medium (affiliate link). I got Liquitex but you can use other brands like Pebeo, Amsterdam, etc. A lot of artists have issues with getting cells from Liquitex and prefer floetrol for that reason.
Floetrol is very popular as a general use alternative used as a pouring medium.
Water is also used either with these mediums or on its own. It’s the least popular choice. People also combine it with PVA glue. I’m not convinced. I have tried it. I didn’t like it and it stank. Also, I would be worried about the chemical reaction, I’d need to look into it more before trying it again. I’d avoid PVA glue until you are more experienced or know it is safe as the results are hit and miss.
18. Stirrers
You can buy in sticks for stirring, craft sticks or reuse lollipop sticks. I have added them to my full list of Acrylic Pouring Materials needed on Amazon however, you can get them cheaper elsewhere.
I also use them for taking the paint drips off of the finished work.
Longer-Term Acrylic Pouring Materials And Equipment
As you get better at your pours you might want to start to mix your own paints. Most artists do. Once you do this it gets much more complicated which is why I think it’s a good idea not to until you have some successful pours under your belt.
19.A Comb
I’ve seen a wide-toothed comb used for some techniques and as a palette knife.
20. Swipe Plastic
I’ve been concentrating on the kiss techniques and dirty pours so haven’t tried this yet. But for the long term, you will need something to swipe with if you want to try swiping. You can use hard but bendable plastic for this as well as other items.
21. A Raised Flat Surface To Work Your Pour With A Protective Surround
Some of the more experienced artists had homemade protective surrounds with a wire mesh attached. This is a great idea as acrylic pouring is quite messy. I’m a bit stingy with the paint so there’s not much surplus so after the initial runoff I don’t get much more paint dripping. But its difficult to judge or people use a lot more paint and some artist have paint run off for hours after the pour.
Regardless of what you use you do need to raise your painting off the surface unless you want it stuck to it.
22. Turntable For Pour Spinning
Some techniques need to be spun out. Artists use various sized turntables for this. It’s not something you should need immediately you start you want to get the basics down first.
23. A Heat Gun
I mentioned a blow torch earlier to use to create cells in place of a torch. You could also use it in its own right as it moves the paint around and creates different designs.
24. Cookie Cutters
I love this method. You put the cup onto the canvas already with paint on it and fill the cup with different color paints. The cup shifts across the paint creating amazing colors and shapes as it loses its paint. You can simply cut a plastic cup down if you want to try it but the cookie cutters make amazing swirls like a candy cane.
25. Varnish
There’s something very vibrant and deep about the layers of a shiny piece of the acrylic pour. A good way to maintain that is to varnish over it once it’s dry.
26. Silicone Oil Cleaners
If you use silicone oil it will need to be cleaned off once your work is dry.
27. Colander
I haven’t tried this yet but it looks like an awesome technique. You need a colander kept specially for pouring if you use this method.
There are many other things people use. This method of painting seems very innovative. Each artist has experimented with different things and techniques and come up with their own solutions. You have to make sure it’s safe to do so obviously and keep it all separate from your usual cooking equipment.
28. Tutorials
Oops, nearly forgot this one. Last but not least you need to learn the techniques. There are lots of channels on youtube where you can learn techniques for free. Everyone has their own favorites and styles, I like serval artists. I found the left-brained artist to be an excellent tutor to start.
However, I recommend that you try different artists. Even just watching an artist work can teach you things and give you ideas.
